Plucking your eyebrows at home is a satisfying way of maintaining their shape between salon visits. At first, it may seem a little tricky, but with the right tools, patience, and a steady hand, you can achieve natural, polished brows. I have written this guide to cover the basics and help you through the process, with a few tips thrown in to make it easier and more effective!
Gather Your Tools
Before you begin, make sure you have everything you need:
- Tweezers: Opt for a high-quality pair with a slanted tip for better precision.
- Mirror: A magnifying mirror is ideal for seeing fine details.
- Good Lighting: Natural light is best, but if you’re indoors, make sure the light is bright enough.
- Spoolie Brush: This is essential for brushing your brows into place.
- Ice or a Warm Cloth (Optional): To soothe the skin after plucking.
Tip: Clean your tweezers with rubbing alcohol to ensure they’re free of dirt and bacteria before you use them.
Determine Your Brow Shape
Firstly, you need to decide on the shape that you are trying to achieve. If you’re unsure, follow the natural arch of your brow. A basic method of finding your ideal shape is by imagining three points:
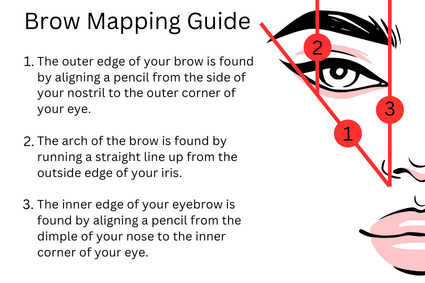
- Start: Hold a pencil or brush vertically against the side of your nose. Where it crosses the inner corner of your eye is where your brow should start.
- Arch: Hold the pencil vertically at the outer edge of your iris. Where it crosses your brow is where the highest point of your arch should be.
- End: Line the pencil from the side of your nose to the outer corner of your eye. This is where your brow should end.
Tip: Don’t be overly obsessive trying to get perfect symmetry; most people’s brows are naturally a little different, and that’s completely normal!
Brush Your Brows
Before you start plucking, use the spoolie to brush your brows upwards. This helps you to identify which hairs are too long or stray out of place and need removal.
Tip: Brush your brows in the direction of hair growth, and make sure all the hairs are going the same way to get a clear view of the shape.
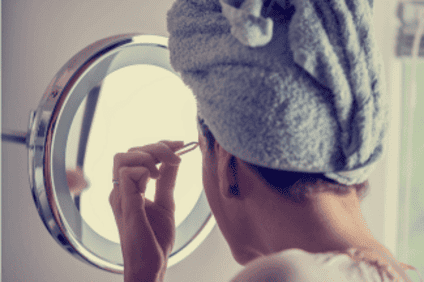
Plucking Your Eyebrows
Now comes the plucking part! Gently pull the skin taut with one hand and use your tweezers to remove hairs one by one. Slow and steady is the rule, working carefully along the brow.
Tip: Pluck in the direction of hair growth and always pull the hair out in a quick, smooth motion; trust me, its less painful.
What to Pluck:
- Above the Brow: Remove any stray hairs that fall outside the natural arch for a clean shape.
- Below the Brow: Focus on the area under your brow, looking for any unwanted hairs that may make your brow look messy.
- Middle of the Brow: If there’s a noticeable unibrow, pluck a few hairs between your brows; make sure to leave a small gap for a more natural look.
Tip: Take breaks! It’s easy to get carried away, but stopping frequently helps you avoid overplucking.
Check for Symmetry
After you’ve plucked a few hairs, step back and review your progress. Take a careful look at both brows to ensure they’re relatively even. It’s okay if they’re not perfectly symmetrical, but try to keep them balanced.
Tip: Don’t worry if they’re a little uneven at first. Eyebrows grow back, and you can always go back in for minor adjustments.
Soothe the Skin
Plucking your eyebrows will often leave your skin red or a little irritated. To soothe this, you can apply a little of aloe vera gel or a cold compress like an ice cube wrapped in a soft cloth.
Tip: If you do find that you are prone to redness, try plucking after a warm shower when your pores are open, making the experience a little less painful.
Optional: Trim Your Brows
If your brows have long, unruly hairs that aren’t ready to be plucked, use a small pair of grooming scissors to trim them. Brush the hairs upwards, then carefully trim any that extend past your natural brow shape.
Tip: Be cautious when trimming—less is more! You can always trim a little more, but you can’t put it back once it’s gone!
Finishing Touchs
After you’ve finished plucking and trimming, use your spoolie to brush your brows back into their natural shape. For a more polished look, you can use a brow gel or wax to set them in place.
Tip: If you like a fuller brow, gently fill in any sparse areas with a brow pencil or powder.
Maintain Your Brows
To keep your brows looking fresh, pluck any stray hairs every couple of weeks. Avoid overplucking, and let your brows grow out naturally to maintain their shape.
Tip: If you’re unsure about plucking yourself, you can always seek the help of a professional to shape them every few months.
Final Thoughts
Plucking your brows is a simple way to enhance your natural look. With a little practice, you’ll be able to maintain well-groomed brows that frame your face beautifully. Remember to take your time, avoid overplucking, be patient, and trust the natural shape of your brows!
If you would like to get started with plucking your own eyebrows, I have listed a few suggestions below:
Tweezers
Mirror
Spoolie Brush
Eyebrow Wax
Brow Pencil
Tweezers Kit
www.lookladies.com operates www.lookladies.com and may operate other websites. It is www.lookladies.com policy to respect your privacy regarding any information we may collect while operating our websites.